Shipping a computer
A friend of mine that lives in another state, decided to send one of his unused computers back to one of his relatives, he reformatted and packaged all the discs and papers in a single box, the old Pentium 4 socket 478 HP case was wrapped in protective foam to ensure it would not get damaged during transport, and shipped it off expecting nothing to go wrong.
Something did go wrong
Upon arrival his relative noticed a funny rattle like sound coming from inside the box, and as the box was moved from side to side, it felt as tough there was something heavy "loose" inside, beeing a care full person, the relative contacted my friend about the issue before trying to plug it on, to which he promptly asked to open the box and open the case door, and they where surprised to find "a big piece of metal with a fan, hanging from the inside of the computer, and the metal had a part full of copper pins all bent and warped"
I can fix this !
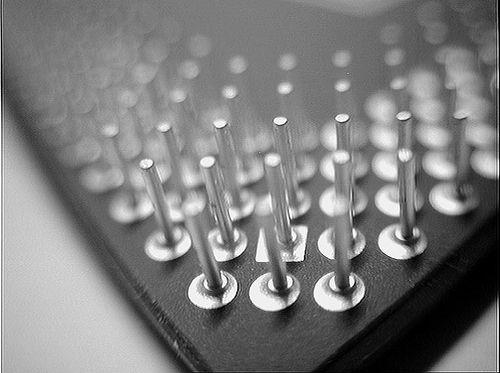
Well that is how i got a hold of this challenge, and having fixed a few pins in my time i decided to give it a try and share with you what can be done to bring the cpu back to life! we are gonna ned a few tools for this:1-Ink refill syringe needle: this is the perfect tool for bent pin repairing, as you can see these syringes have a flat tip , so there is not danger of injury, if you cant get your hands on a flat tip syringe needle, you could fabricate your own, by cutting a normal syringe tip with metal cutting pliers, the tube might get warped or even flattened, but the important thign is to have enough space to "grab" the pin and bend it back in position.

ink refill syringes have flat tops perfect for the task!
2-A magnifying glass or good vision: the pins are small and you will spend a lot of time trying to wrap the syringe tip around each one of the pins, without bending the others! you can also use a video camera and a tv monitor like i do! which is a bit tricky at first to co ordinate hand to eye movement but its ok once u get the hang of it.
3-A thin piece of metal: this will be used to "align" the pins once you got them in place, by using the ones that are ok as guide, you will have to push it flat against the pins from one side and the other, to try to make the pin tips go in the right place so they sink in intot he motherboard socket. Any flat metal will do, it just needs to fit between the pins, you can use a knife edge for this too!
4-Patience: this will be a very frustrating process and you have to be very care full if you force the bent pins back in position with a lot of force you might break them off and render the CPU useless, bear with the task and go slowly 1 by 1.
Optional: A motherboard socket of the same type that you can strip down and use as guide for the pins, i was lucky to have an old 478 motherboard lying around, i cracked the socket in pieces and used the corner parts to align several pins at a time.

if you can find an extra socket and pry it apart it will make a good guide to further align the pins
How i did it - My old video camera recorder sucks =(
I like to work up close and personal with electronics and for this i have a TV hooked up to an old Sony super-8 Video camera and a tripod , pointing down at my work area so i can zoom into the action!, the camera is old and it records to memory card only at 320x240 video resolution, the tape module was broken long ago, so you will have to excuse the low quality video, but it should be enough to aid in my explanation below!THIS IS ME REPAIRING THE CPU!
behold my fat fingers :D
With the metal tool you want to slide it along the pins and use the good ones as guides, carefully pushing from the sides until all pins form a straight line, then you repeat the process for every "line" of pins.. and when you are done, you have turn the cpu 90 degrees to a side and repeat the process all over again, i said it would be tedious!
When you have them as best lined up as you can, ts time to test them into the socket, this can be tricky and if you push too hard you might actually end up bending some pins again and breaking them off, you really have to go slowly here as some pin tips will not be in their correct position, and will have to "feel" the cpu as it falls into the socket , and where it gets stuck, carefully inspect the area, and move the pins so that the tips all align in rows horizontally and vertically
This is where the broken up spare socket can come in handy as you can take corners of it and slide it into the cpu, and off a few times, each time pushing from the sides so that you start to straighten the pins over and over again, keep it up you are doing great!
Finally, when you know the pin tips are aligned as best as you can , you place the cpu over the socket and carefully push straight down, hoping that every single pin is aligned and in its place, sometimes it will budge with a few nudges.. but some other times you have to take a leap of faith and push down hard until it slides in place... you can then slide it out and check the pins if none is bent, you successfully aligned well enough to fit into the holes, if no.. well hope they didnt break and try again!
Apply thermal paste and Seat down the heatsink, cross your fingers and rev it up!.. it worked for me ! :D
I hope this helps you if you ever run into a similar problem, in any case drop me a line for any question!
Thank you and have a wonder full week :D
Wow, bad luck. D:
ReplyDeleteBut I'm glad you were able to fix it.
The only thing I've made is open my NES to cut some pins, but I didn't need to be too careful, those things never die. haha
Very handy little tutorial ^_^
ReplyDeleteVery useful this post!
ReplyDeletethx for this!!
ReplyDeletethis can be useful thx
amazing work well done, really great post!
ReplyDeleteWoah that's something nice to learn, thanks for the post, and you should really update this blog (i'd like to read more from ya).
ReplyDeleteNice post. I've got a Core 2 Duo E6700 with 20% of the pins bend. Will try this out, and let you know!
ReplyDeletethis could be more useful if you posted it months ago when i needed to repair my cpu... but hey, great post!
ReplyDeleteGREAT POST
ReplyDeleteJust in time, I really need to fix my cpu.
ReplyDeleteThanks for sharing.
ReplyDeleteI don't have the guts to try this. It looks simple when you tell it, but computers are unexplored territory for me.
ReplyDeleteStill, a great post, I didn't expect anything less coming from you.
Ugh... I know this problem all too well.. One of my friends had somehow bent the pins on a socket AM2 chip. Athlon 64 X2 5200+. One side was completely bent. Took me quite a few hours to finally align all of the pins. I didn't have the tools necessary either.. Such. A. Pain.
ReplyDeleteThis is awesome bro. Had this problem once, wish I had this guide back then!
ReplyDeleteThis comment has been removed by the author.
ReplyDeleteOMG VERY USEFUL O.O! THX
ReplyDeletehow did you know how to fix it, i would have just cried in a corner if that happened to me, did you had experience with that problem before it happened to you?
ReplyDeletedaym, thanks, I've been having problems with these, saw it when I opened the front panel of my pc
ReplyDeletethe bent pins I mean :)
ReplyDeleteYou seem like a regular McGuyver
ReplyDelete@rems yeah i have doen this before.. and thought i should share on how i do it :D
ReplyDeleteGood for you that you that you were able to fix it! You should be proud of yourself :)
ReplyDelete